Control EVB with H-center
This section describes how to configure, monitor, and evaluate the H1P EVB using the H-center application. The primary workspace overview and main interface layout are shown in Figure 6 below.
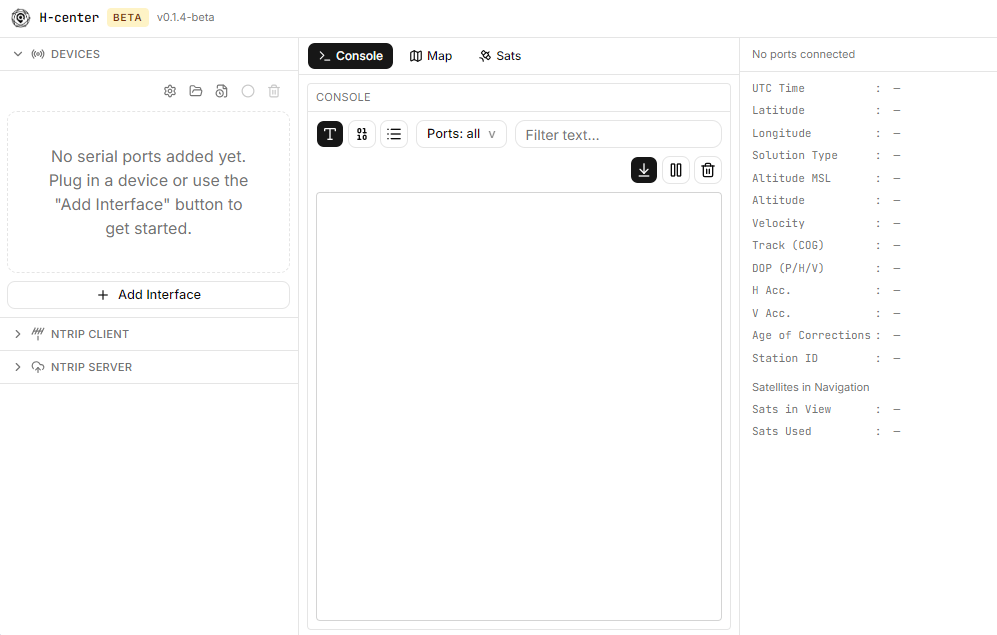
Figure 6: H-center main workspace interface
Add Interface
When connected to the host PC via SN#9 (USB-to-UART), the FTDI USB-to-Serial converter generates virtual communication (COM) ports that are automatically detected by H-center. To establish a connection, click + Add Interface to open the Add Serial Port dialog, select the target COM port(s) under Detected ports, ensure the Baud Rate is set to 115200 (Default), and click “Connect”.
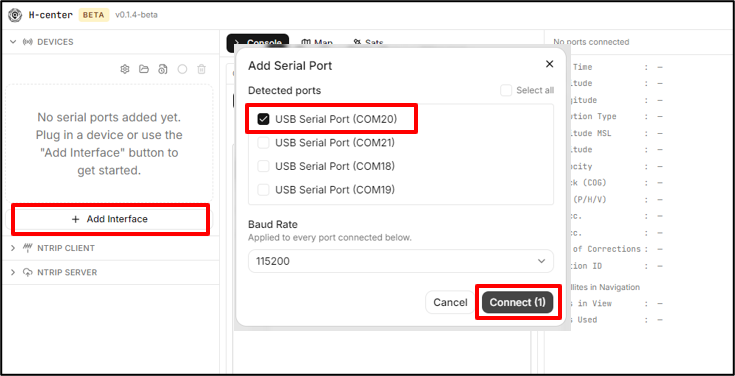
Figure 7: Connecting H1P EVB via H-center
Messages Setting
Once an interface is connected, open the Device Configuration dialog by clicking the Gear icon under DEVICES. From this dialog, select the TARGET PORT (e.g., COM20), choose your desired protocol tab (NMEA, UBX, or RTCM), and check the boxes next to the message types you want to output. Use the dropdown menus to assign individual update rates—supporting 1 Hz, 5 Hz, 10 Hz, or 20 Hz—and click Send NMEA (or Send UBX / Send RTCM) at the bottom to apply the settings immediately.
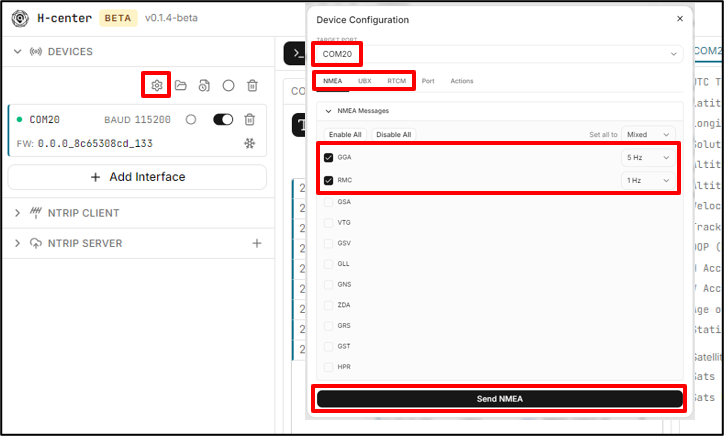
Figure 8: Configuring messages in H-center
NOTE
Clicking Send NMEA applies a full configuration override based on your current dialog selections rather than toggling individual messages. Any message unchecked in the settings—even if currently enabled on the device—will be disabled upon sending.
Action Commands
The Actions tab in the Device Configuration Dialog provides essential device control and configuration persistence management.
Key Action Commands
-
Save All Configurations: Saves active runtime settings (baud rates, message types, and output frequencies) to non-volatile memory so they persist across power cycles.
-
Clear All Configurations: Wipes stored non-volatile settings and restores active runtime configurations back to default operational state.
-
Factory Reset: Performs a complete receiver reset, clearing non-volatile configurations and resetting hardware defaults.
-
Reboot with Cold Start: Triggers a GNSS engine reset to clear position history, almanac, and ephemeris data to force a fresh signal acquisition cycle.
-
Disable All Output: Mutes all outgoing message streams across NMEA, UBX, and RTCM protocols on the selected port.
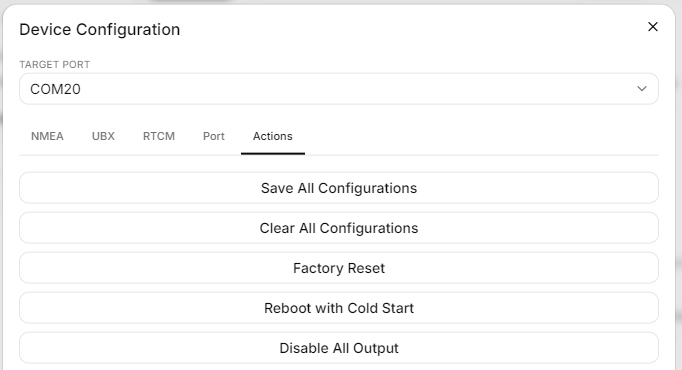
Figure 9: Device Configuration Actions tab commands
Record Data
H-center allows you to capture and log raw stream data from individual serial ports or across multiple active interfaces simultaneously.
To record a log session, click the Record icon (◯) in the header bar. This opens the "Record a new log file" dialog:
-
Storage Location: Specify your target folder under File location by clicking Change.
-
File Naming & Templates: Customize your Log filename template using available format codes (such as %Y, %m, %d, %h, %M, %S, %p, %W, etc.). A real-time preview of the output filename is displayed directly below the template field.
-
Port Selection: Under Ports, check or uncheck the specific serial ports you want to log.
Click Record log file to start recording. Click the record button again at any time to stop logging. To quickly access your saved log files, click the Open Folder icon (📁) in the top header.
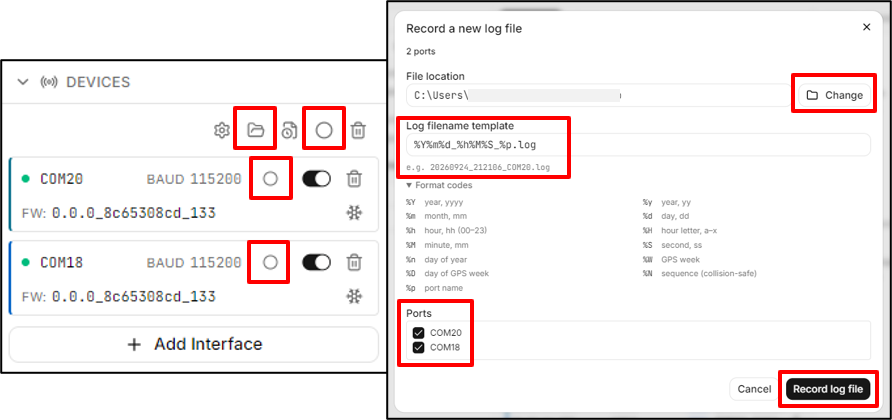
Figure 10: Data recording controls and path configuration settings
Replay Log Data
H-center allows you to load previously recorded log files to simulate live receiver stream playback for analysis and troubleshooting. Note that H-center currently supports playing one replay file at a time.
To replay a log file:
-
Click the Load Replay File icon in the DEVICES header panel to browse and select a saved .log file
-
Once loaded, a dedicated playback card appears under DEVICES displaying the filename, current message index position, total message count, and player controls:
-
Play / Pause: Start or pause continuous stream playback in real time.
-
Next Message: Advance the playback frame-by-frame by step-feeding a single message to the console and visualization windows.
-
Scrubber Bar: Drag the position slider to jump directly to any point within the log file.
-
Playback Speed Selector (1x): Adjust the playback rate using the speed dropdown menu.
-
Remove / Unload: Click the trash icon on the card to close the current replay file.
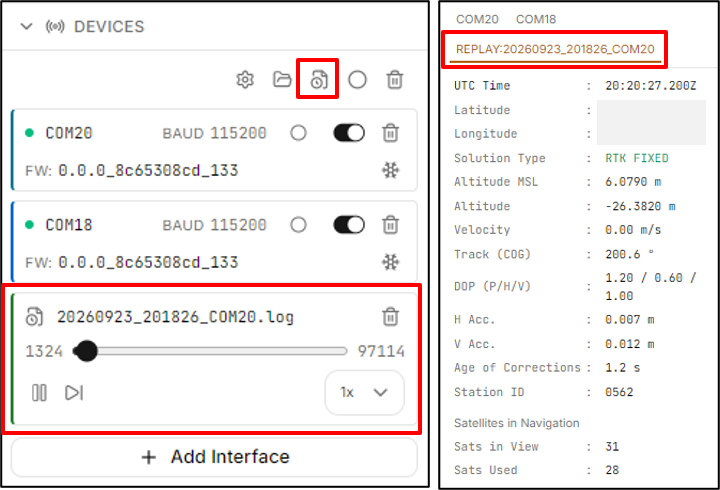
Figure 11: Replaying log data in H-center
Setting up NTRIP client
To receive correction data from an external caster, expand the NTRIP CLIENT panel and enter your setup details:
-
Caster & Credentials: Enter the SERVER address (e.g., rtk.geodnet.com), PORT (default: 2101), VERSION, target MOUNTPOINT, and your USER and PASSWORD credentials.
-
RTCM Output Ports: Select the destination COM port(s) under RTCM OUTPUT PORTS to forward correction data to your receiver. While H-center can broadcast to multiple ports simultaneously, selecting a single active port is recommended for standard H1P EVB setups.
-
GGA Source: Select Receiver or Fixed reference as your NMEA feedback position, configure the update interval, and specify the GGA SOURCE PORT.
-
Connect: Click Start to connect.
Once connected, the status bar displays live streaming data metrics, and the monitor panel updates to RTK FLOAT or RTK FIXED.
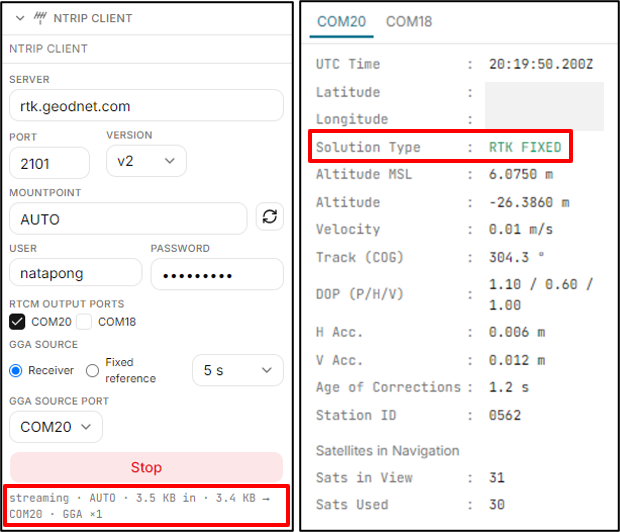
Figure 12: NTRIP Client configuration panel
Setting up NTRIP server
To upload local correction data (RTCM stream) from your H1P EVB to an external caster, click the + button under NTRIP SERVER to open the Add NTRIP Server dialog:
-
Enter the CASTER HOST, CASTER PORT, VERSION, and MOUNTPOINT NAME.
-
Select your RTCM source under SOURCE SERIAL PORT (and optional credentials) and click Add Server.
Once active, a card under NTRIP SERVER displays live status and controls to edit, toggle, or delete the profile. H-center supports running multiple NTRIP server profiles simultaneously.
NOTE
H-center does not automatically configure RTCM output messages. You must manually manage your RTCM message outputs by referring to Section 4.2 Messages Setting to enable or disable specific RTCM message types and adjust update rates on your target source port.
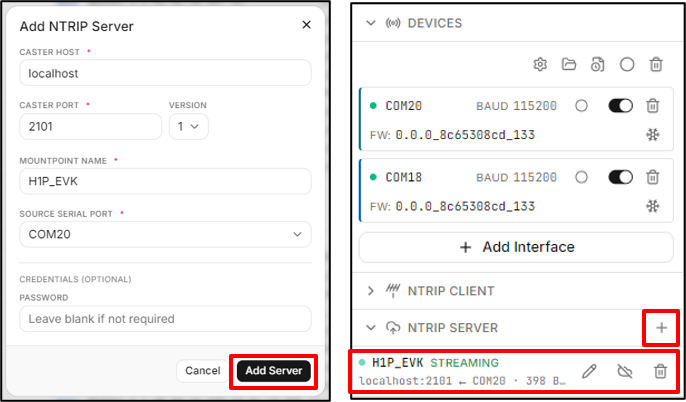
Figure 13: Add NTRIP Server dialog configuration panel